Check Out These Pages, Too!

"Possibility and promise greet me each day as I walk out into my garden. My vigor is renewed when I breathe in the earthiness and feel the dirt between my fingers. My garden is a peaceful spot to refresh my soul." Meems


Welcome to my Central Florida Garden Blog where we garden combining Florida natives, Florida-Friendly plants, and tropicals.
Showing posts with label bulbs. Show all posts

Thursday, May 26, 2011

Rain Brings the Lilies


Blushing pink Rain Lilies (Zephyranthes) appear quite regularly following ... you guessed it ... a good rain shower in late spring.

Short in height with fairly insignificant grass-like foliage from tiny bulbs that multiply on their own they are repeat bloomers throughout the season. Even into mid-summer flowers will flush out although not as abundant as this time of year.

I wish I could say this mass of lilies is mine. I DO have a few of them scattered in pockets here and there. But not a display quite as stunning as my sweet neighbor, Ms. Helen, across the street from me. She has shared so many wonderful plants with me over the years including many rain lilies.

These plants prefer a location with a good deal of sunshine (which is one reason I don't have more of them). Given a warm site along with a healthy down pour to urge them forth they are an easy, simple-pleasure lily to grow in Florida.

Fortunately for me, Ms. Helen's are planted en masse on the street side where I get to savor their delicate blush of pink and smile everytime I glance over at them.

Friday, September 10, 2010

The Glories of Late Summer


Every year is different. Gardeners can't possibly know for certain how our gardens will fare by summers' end.

Will they melt away with the heat or will they stand the test to flourish in spite of harsh circumstances? The elements out of our control in the midst of summer can make all the difference.

Rain or the lack of it, the heat index, humidity levels, storms, and weather patterns. All factors lending credence to the stress levels of a Florida garden.

Perhaps this is true, more or less, no matter where you garden.

Having only gardened in Florida all my life it is Florida summer I'm very familiar with and more and more in-tune each year to how it affects plant-life.

Planting Caladium x hortulanum bulbs in spring and/or summer has the potential to deliver loads of lasting pizzazz to the late summer garden.

It has been discovered here that no matter what those overly-heated months of July and August have in store for us, the caladiums are shining stars well into September... and if planted a little later will stay perky as long as October and November.

It is no secret I'm a huge fan of the ease of maintenance and the colorful zing they possess shamelessly tucked into just about every border somewhere or the other.

Fortunately for Floridians, the conditions caladiums prefer are just what we have to offer.

Soil temperatures of at least 75-78 degrees and high, relative humidity of 90% is what they ask for to perform well.
Choosing the appropriate variety of bulb is key to the overall outcome to be enjoyed in the landscape design.

There are so many to pick from and they range in color, height, and sensitivity to sunlight.

All those heart-shaped leaves poking their pretty foliage out in between other plants is what makes them stand out.

Naturally, I'm a little biased. But don't they just look good in any setting!

But forced into narrow spaces in great numbers is what we prefer for their sassy way of being noticed among all the other textures and forms welcoming them as summer-long residents.

Yes, I'll keep singing the praises of caladiums until the last one fades away. Please don't tell me if you tire of seeing them. That might break my heart. :-)

Thursday, August 26, 2010

Summer Impact With Caladiums


Late summer in the garden means caladiums, Caladium x hortulanum are the main attraction at Hoe and Shovel.
These bright-leaved ornamental plants are becoming increasingly popular and are finally being used in more designs and all sorts of landscaping situations.

Folks are finding out how easily they grow and what little care they take whether planted in the ground or in containers. Making their first appearances beginning in spring they (can) last through November in many instances. That equals a fairly short dormant period.

They are versatile plants, to say the least, requiring no fertilization and being susceptible to no pesky pest problems. [The Eastern Lubbers will chew on them but they are rude like that with no manners for ordinary rules whatsoever.]

In this climate it is not necessary to pull the tubers or bulbs out of the ground in winter. Our soil doesn't freeze even if the surface temps dip below freezing.

Leaving them in the ground when dormant means I lose some to my own (digging) habits and some could possibly rot and some are dug up by armadillos that habitually root around in the soil. But for the most part caladiums can be counted on to return each year.

Even so, it is my habit to purchase hundreds additionally each spring. Buying bulbs is much more economical than purchasing the already forced plants you find for sale in the garden centers.

Most gardeners I know tend to be in a hurry to get their caladium bulbs in the ground as soon as spring arrives. And that is certainly okay.

But I tend to wait until very late spring and even into the weeks of summer to plant my new bulbs.

This year I planted some as late as last week. They come up out of the ground very fast this time of year.

Waiting until later in the season to plant gives the returning caladiums a chance to emerge from the ground once the soil temps warm fully. At that point, I can better see which areas need to be filled in to add the most impact.

Speaking of impact, my usual method is to plant en masse with like-varieties. But mixing them is certainly an option for an all together different appeal. It is a matter of preference.
Caladiums are available in a diverse range of leaf colors, shapes, and sizes.

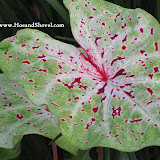
White Queen and Florida Fantasy are among the most widely used here as their preferred white leaf with deep magenta veining shows up well in the shady parts of the garden.
Although it should be noted that White Queen can emerge from the ground more green, pink, or red. Fertilizer or soil conditions or maturity can attribute to these factors.

Florida Fantasy, however, is a true white leaf with deep magenta veining.

Backlit, the green veining is pronounced in the White Queen. This variety is also sun tolerant. Some people have the mistaken idea caladiums can only be grown in the shade.

Oh, and all the impatiens you see mixed in are self-seeded. They grow like weeds in the shady garden. But that's another story.

You can probably tell by now how easily caladiums adapt to almost any design and setting in the garden.

And for this lover of foliage they have become my all-time-favorite plant for surviving our humidity and for supplying summertime color and impact. Everywhere.

They blend as well with exotic bromeliads as they do with native firebush, Hamelia patens squeezed-in curvaciously between borders and the foundation plants we enjoy all year long. Offering big doses of tropical lushness they become companions to just about any and every other plant in all areas of the front and back gardens.

I've not found them to require extra water even in the hottest months. Rainfall is sufficient for them. I can't remember ever having to give them extra irrigation.

They do prefer a highly organic soil that has both good moisture holding capacity as well as good drainage.

Container gardens are perfect for adding a pop of color with my favorite bulbs. And there's hardly a container here that doesn't display either a taller variety for the thriller or a shorter variety for filler.

Then there is red!

Florida Cardinal red.

So brilliantly red.

Red Flash. Both red varieties growing well in sunny spots or shade.

There is a technique called de-eying for a fuller, more compact plant which I have not tried. But here is a good article on the process if anyone is interested.
And for more on growing caladiums from the University of Florida Research Center go here.

More Florida Fantasy mixed in with varieties of 'whites' in the front gardens.

In the deepest part of the tropical pathway, where the dappled sun only shines well in the mornings, an all 'white' variety is tucked underneath the colocasias to draw the eye beyond the larger, dark leaves.

A 'mix of whites' curving out in front of White Queen.

Caladiums have become the signature plant at Hoe and Shovel because I adore their uniquely patterned leaves while the considerable beauty of them inspires me thoroughly.

I hope you love them too! They will surely add joy to your gardens as they have mine if you give them a try!

Happy summer!
Meems

***********
If you'd like to see more images (yes, there are more) of caladiums in my garden follow this link to view the entire album in Picasa.

Thursday, April 24, 2008

Size Does Matter

I'm very excited about my new Taro plants. One is Midnight and I split the Illustris (above) to make two --planting them among the existing purple queen and lavender lantana. White caladiums should be popping up to surround these deep purple lovelies any day now.


It's definitely one of my least favorite things on the "chores" list. But sometimes it has to be done before you can get to the fun part of gardening. Seems I've done it a lot lately and thought I was doing my best to avoid anymore of it for this season.

It was not to be. I just couldn't get away from making one more bed just a little wider and just a little longer.

While there is much being written in the blogosphere by northern gardeners elated to finally have some spring weather and rightly so, I am trying to beat the clock that is quickly moving toward the soon-to-come heat and humidity. There was a 'front' that moved through here last week which produced for us some divinely dry (no humidity) and cooler weather. At least the days start out that way in the mornings... up to 80's in the afternoons but very manageable gardening weather especially in the shade.
SO... these last couple of weeks I have spent oodles of hours (read: days) in the garden. And it's a good thing because I'm still not completely finished with my 'project list'.

There were several sort of random plants I needed to get in the ground. Random... because I bought a few of this 'n that when I was in Tallahassee last weekend. Then on Tuesday of last week I received a shipment of bare root day lilies and irises (ordered in February), a box of 50 hurricane lily bulbs from another source and some seedlings I had gotten at a gardening-talk at the local library. Random... because none of them necessarily went together. So I ended up with lots to get into the ground and lots to figure out... as far as where it was all going to end up. Keeping in mind, I had convinced myself I was finished with new projects and plant purchasing for this spring... I've been doing this since February... I'm supposed to be winding down...

Let the Designing Begin
Most of my new purchases needed a sunny home and there aren't that many options for full-sun around Hoe & Shovel.
So here I go one more time ... finding it necessary to expand another bed which means digging out sod! Ugggghhh! This time the removal was only about 3 feet wide (@ the widest point) and about 12 feet long. Here's the rub... I had just a few weeks ago dug out part of this same area and planted what you see in the above photo. It just wasn't large enough .... already.
One of the beds I enlarged last November was the intended home for the awaiting day lilies. The more I thought about it though I wasn't confident that particular location, offering dappled sunlight in the afternoon, was going to give them the amount of sun they need. Instead I put the largest majority of them in another existing bed (in the back garden- shown below)
which will give them morning sun-- then later in the day ---filtered sun. It was necessary to remove a border row of variegated liriope to make room for them. Don't worry I made a new border in my new expanded bed with what I dug up.

All this bare root ordering/planting is completely new to me. When the on-line seller says bare root --- they mean bare root... root with barely any green growth. It's sort of a learning thing so what I've decided to do is divide up each variety and plant them in completely different spots in the garden. Then I can determine where they do best. I figure surely some will survive and then I'll know under what conditions which plants succeed. (Look closely at the photo to see the slug that already found this brand new growth on one of the day lilies- I was actually taking the picture to show how quickly the greenery is shooting up-- in just 4 days) I'm happy to report some of the lilies and irises already have new growth sprouting out (above photo) after only a few days in the ground.I think enlarging this bed was worth the trouble. It has a much nicer flow giving the overall side-yard area a more complete look. Also as you can see from the opposite-angle-photo below it lends itself to blending/continuing better with the front side-yard plantings.

So here's the run down for making this bed happen:

Moved yellow Bush Daisies to group three together next to Fire Spike.

Moved Butterfly plant next to bush daisies.

Planted Louisiana Iris (bare root)

Planted Day Lilies (Bare root)

Planted Midnight Taro in place of Butterfly plant removed

Planted Illustris Taro ( split it to make two and planted on either side of Midnight)
Planted border row alternating variegated Liriope and Amaryllis

Planted seedlings of Blue Porterweed (given to me by a master gardener at the library talk on day lilies)

Sowed Rudbekia seeds

Sowed Echinacea seeds

Sowed Coleus seeds

Planted 1 white yarrow (also given to me at the library talk)Much of what I've planted is new to me. Isn't that exciting ? I've definitely stepped out of my comfort zone. There's lots of potential for color bursting forth with maturity and growth here in the next months of the growing season. I'm certain to give updates as the blooming begins!

When I bought two of the hydrangea it was my intention to put them together in the very back side of the garden. They will get quite bushy and tall. Instead I put one in the front under the oaks and among the azaleas and palmettos and one in the back. I just had to have one that I could see as I come and go out of the driveway.
Not in this bed:
Planted the two Oakleaf Hydrangea I found in Tallahassee. (I am so thrilled over finding these and the thought of having them in my garden. It was necessary to amend my soil with lime to reduce the acidity around them .... hoping with all my gardening fervor these do well here.)
Planted some Bella Donna Lilies
and the Hurricane Lilies
planted coleus and
sowed some coleus seeds
I moved several other plants around in the back gardens and made a new bromeliad bed I'll include in a post sometime in the future.
After digging the sod it's all fun stuff from there.

September 2010

Back Garden: October 2010

Louise Philippe: Antique Rose

Tropical Pathway